You Measure - We Build: Duct Insulation
Neptronic heaters can be designed and ordered with either an insert (slip-in) or flanged type frame. Knowing in advance which type is required can save time and money on field modifications as well as avoid any possible damage to the heater. Our heaters are designed and approved for zero clearance to combustible materials. This means that there is no restriction on the distance between combustible materials and the section of the duct housing of the heater or the heater itself. However, if there is duct insulation, the heater must be sized accordingly to fit.
Before ordering, it is important to carefully study the duct work where the heater is going to be installed.
Few main points to check prior to designing/ordering the heater;
- Inside duct insulation/lining: Need to consider insulation thickness for heater sizing.
- Minimum clearance to allow upstream and downstream of heater:See TechTime article from July 2015
- Any obstacles that could restrict space for the control panel such as beams, walls, pipelines etc.: Remote control panel option available.
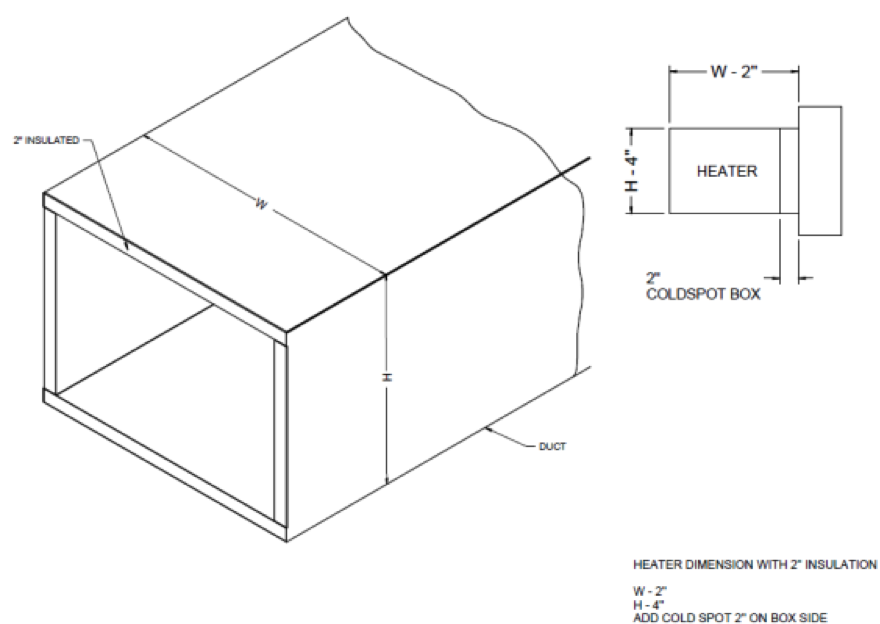
Insert (slip-in) type: These heaters are designed so that the entire frame can be inserted into the duct. If there is insulation inside the duct, it is important to take the insulation thickness into consideration when sizing the heater. Measurements given for fabrication must be the inside dimensions. Also, it would be recommended to add a cold spot on the box side in order to have the manual thermal cutout exposed to the airstream. The below drawing, shown as an example, is with a 2” thick insulation.
The table below shows basic information about standard open coil and tubular electric heaters.
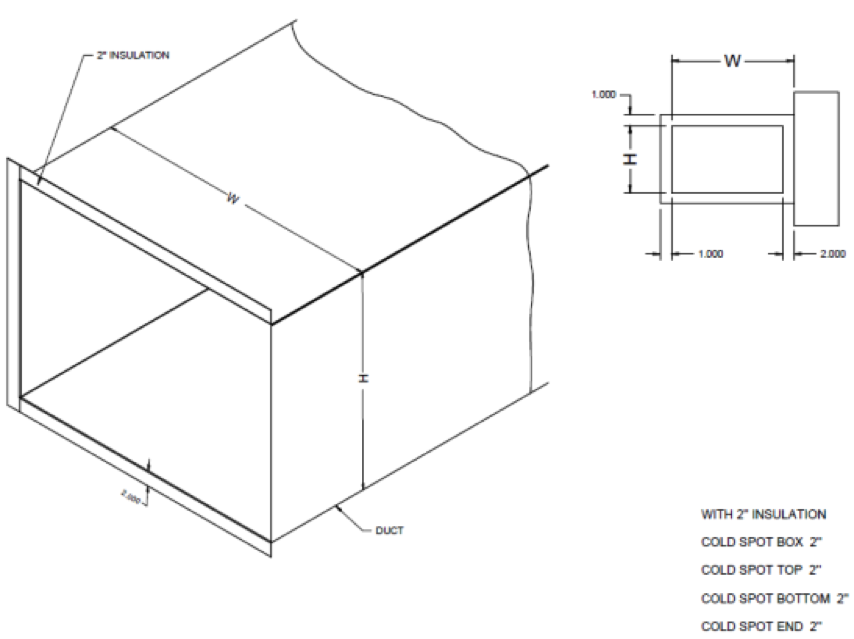
Flanged type: Flanged heaters are designed so that the heater is in an integral part of the duct work. The heater frame is attached to match the duct flanges. If the duct has inside insulation, it is recommended to add cold spots (blank offs) on all four sides to have the automatic and manual thermal cut outs exposed to the airstream. This will also ensure that the heating elements will not create any hot spots due to a lack of air. The below drawing, shown as an example, is with a 2” thick insulation.
Read installation instructions provided with the heater before installing.